Thursday, April 9, 2009

Reversible Sling Pocket/Pouch - step 2


Reversible Sling Pocket/Pouch - step 2
Originally uploaded by umgeekgirl

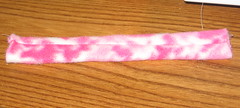
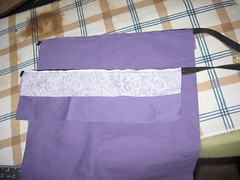
PIN the zipper between the lining piece and the main pieces. Then BASTE your layers together.

The fabric edge of the zipper should line up with edge of the pocket and flap. The right sides of the pieces of fabrics should be facing each other.

NOTE: The zipper I had was too long and I needed to shorten it. I should have shortened it from the top/open end instead of the bottom/closed end. It worked out OK though.

Reversible Sling Pocket/Pouch - step 1


Reversible Sling Pocket/Pouch - step 1
Originally uploaded by umgeekgirl

CUT out pocket and upper flap out of your main fabric.

CUT out smaller strips of "lining" to cover ugly zipper on reverse.

MAKE 1/2" double fold "bias tape" from 2" wide strips of fabric. It has to be enough to cover the outside parameter of the pocket. It doesn't have to be bias cut since we are only dealing with straight lines.
(not pictured)

***** NOTE: When I first made this (and when I was taking pictures) I made the pocket WAY to huge. It should be the right size to be able to contain your sling, but not too big to interfere with adjusting the sling.

Reversible Sling Pocket/Pouch - prep


Reversible Sling Pocket/Pouch - prep
Originally uploaded by umgeekgirl

My open tailed sling is about 30" across. I wish to add a pocket to it that when flipped inside out can be stuffed with the sling and zipped shut.

Materials:
- Reversible zipper: My Joann's only had the super industrial looking one. I will have to hunt for a more appropriate size the next time I do this.
- matching/contrasting fabric and thread: I used left overs from making my sling and a matching fabric.

Leg warmers


Leg warmers
Originally uploaded by umgeekgirl

Leg warmers


Leg warmers
Originally uploaded by umgeekgirl

http://nevernotknitting.blogspot.com/2008/01/legwarmies.html

Lew warmers


Lew warmers
Originally uploaded by umgeekgirl

nevernotknitting.blogspot.com/2008/01/legwarmies.html

Niece "A" wearing cape


Niece "A" wearing cape
Originally uploaded by umgeekgirl

It was a huge success! She wore it none stop while I was there. She played "butterfly" and wore it as a skirt, wore it over her coat outside and around the house. She would have worn it to bed if her parents had let her. :)

Niece "H" was slower to warm up to it, but she was wearing it by the time I left.

IMG_8681


IMG_8681
Originally uploaded by umgeekgirl

Apron for Mom's Group Gift Exchange


Apron for Mom's Group Gift Exchange
Originally uploaded by umgeekgirl

Made with an upcycled sheet.

Apron skirt: 50" x 22" (I used the finished edge of the sheet for the bottom hem)
Pink Ribbon
Contrasting waistband: 36" x 10", includes 1" seam allowance and is folded in half.
Ties: 2 pieces, 40" x 9"

Directions: These are more notes to myself so they probably aren't very clear.
#1: Apply ribbon trim to bottom edge of skirt
#2: Hem edges of skirt
#3: Sew straps. I made a nice angled edge, because it makes me happy.
#4: Gather skirt and stitch onto one edge of waistband (right sides together). Press waistband up.
#5: Apply straps to waist band. (I have no idea how to describe this process.)
#6: Press waist band in half and fold under final raw edge
#7: Top stich waistband along gathered edge. This will secure the folded edge of the waistband on the back as well.

IApron for Mom's Group Gift Exchange


IApron for Mom's Group Gift Exchange
Originally uploaded by umgeekgirl

Made with an upcycled sheet.

Apron skirt: 50" x 22" (I used the finished edge of the sheet for the bottom hem)
Pink Ribbon
Contrasting waistband: 36" x 10", includes 1" seam allowance and is folded in half.
Ties: 2 pieces, 40" x 9"

Directions: These are more notes to myself so they probably aren't very clear.
#1: Apply ribbon trim to bottom edge of skirt
#2: Hem edges of skirt
#3: Sew straps. I made a nice angled edge, because it makes me happy.
#4: Gather skirt and stitch onto one edge of waistband (right sides together). Press waistband up.
#5: Apply straps to waist band. (I have no idea how to describe this process.)
#6: Press waist band in half and fold under final raw edge
#7: Top stich waistband along gathered edge. This will secure the folded edge of the waistband on the back as well.

Opera scarf for sister R


Opera scarf for sister R
Originally uploaded by umgeekgirl

Burdastyle's Lynn scarf.
www.burdastyle.com/creations/show/14086

The flash really ruins the effect of the fabric

Opera scarf for sister R


Opera scarf for sister R
Originally uploaded by umgeekgirl

Burdastyle's Lynn scarf.
www.burdastyle.com/creations/show/14086

Opera scarf for sister R


Opera scarf for sister R
Originally uploaded by umgeekgirl

Burdastyle's Lynn scarf.
www.burdastyle.com/creations/show/14086

and my preggo belly

Fleece Christmas Stockings


Fleece Christmas Stockings
Originally uploaded by umgeekgirl

One for each kiddos. Next year I will try to decorate them more. But at least they had stockings this year.

The pattern comes from a friend of mine (a great grandmother) who made stockings for each of her many children. I simply traced one of hers.

IMG_8493


IMG_8493
Originally uploaded by umgeekgirl

McCalls 5643 - View A


McCalls 5643 - View A
Originally uploaded by umgeekgirl

For my mother in law for christmas

McCalls 5643 - View A


McCalls 5643 - View A
Originally uploaded by umgeekgirl

For my mom for Christmas. I messed up the flaps and had them on the wrong side. It looks too weighted to one side

McCalls 4534 - View E


McCalls 4534 - View E
Originally uploaded by umgeekgirl

For my sister-in-law and her boyfriend.

Not a huge fan of this pattern. The pockets just look awkward to me

Little Girl's Cape - Close up


Little Girl's Cape - Close up
Originally uploaded by umgeekgirl

I tried to made the trim edge a diagonal. It looked terrible.

Little Girl's Cape - Close up


Little Girl's Cape - Close up
Originally uploaded by umgeekgirl

A straight cut of the trim across the bottom turned out nicer. Although hand stitching might be nice.

Little Girl's Cape - hood


Little Girl's Cape - hood
Originally uploaded by umgeekgirl

A close up of the hood

Little Girl's Cape - Completed


Little Girl's Cape - Completed
Originally uploaded by umgeekgirl

Fleece capes for my two nieces for Christmas

Little Girl's Cape - Step 10


Little Girl's Cape - Step 10
Originally uploaded by umgeekgirl

Attach strip to one side of cap and hook velcro (4") to the other near neckline.

Little Girl's Cape - Step 9


Little Girl's Cape - Step 9
Originally uploaded by umgeekgirl

Attach 4" piece of the loop side of the velcro to strip.

Little Girl's Cape - Step 8


Little Girl's Cape - Step 8
Originally uploaded by umgeekgirl

For closure, Cut out a strip slightly larger than double the width of your velcro and about 6" long(?). Sew long edges together and turn. Secure open ends, I used a zig zag stitch.

Little Girl's Cape - Step 7


Little Girl's Cape - Step 7
Originally uploaded by umgeekgirl

Repeat previous 2 steps to add trim around hood and opening of cape.

Little Girl's Cape - Step 6


Little Girl's Cape - Step 6
Originally uploaded by umgeekgirl

Fold over trim to right side of cape with seam at edge. Sew closed with a zigzag stitch.

I found it very helpful to pin it in place before sewing this step. The fleece got really wonky at points.

Little Girl's Cape - Step 5


Little Girl's Cape - Step 5
Originally uploaded by umgeekgirl

Sew strips to bottom edge of cape. Placing RIGHT side of the strip to the WRONG side of the fabric

Little Girl's Cape - Step 4


Little Girl's Cape - Step 4
Originally uploaded by umgeekgirl

Cut strips 2" wide for edging. You will need enough for bottom of cape (Circumference is 2*pi*r) and edge of hood, and opening.

To save time later, sew strips together

Little Girl's Cape - Step 3 (Step 2 completed)


Little Girl's Cape - Step 3 (Step 2 completed)
Originally uploaded by umgeekgirl

Cut a rectangular piece of fabric.

For 37" girl: 26" x 10"
For 43" girl: 28" x 12"

Little Girl's Cape - Step 2


Little Girl's Cape - Step 2
Originally uploaded by umgeekgirl

Draw a small half circle for neck from the same point that you drew the large circle

For a 37" girl: 3.5" radius
For a 43" girl: 2" ???

Remember that the length of the cap is the radius of the large arc MINUS the radius of the small one.

Cut out circles
Cut straight line from neck circle to bottom edge for opening of cape. (see next picture for completed)

Little Girl's Cape - Step 1


Little Girl's Cape - Step 1
Originally uploaded by umgeekgirl

Draw a half circle on fold for bottom edge of cape.

For a 37" tall girl: radius=28"
For a 43" girl: radius=30"

Tuesday, April 7, 2009

Knitting Roll for sister E


Knitting Roll for sister E
Originally uploaded by umgeekgirl

Knitting Roll for sister E


Knitting Roll for sister E
Originally uploaded by umgeekgirl

Knitting Roll for sister E


Knitting Roll for sister E
Originally uploaded by umgeekgirl

based on lupinbunny.blogspot.com/2007/02/needle-roll-tutorial.html

Really gorgeous fabrics, but I really need a walking foot to work with all those layers.

Baby Blanket for L


Baby Blanket for L
Originally uploaded by umgeekgirl

Baby Blanket for L


Baby Blanket for L
Originally uploaded by umgeekgirl

Baby Blanket for L


Baby Blanket for L
Originally uploaded by umgeekgirl

Flannel and quilting cotton baby blanket. The mother was planning on nursing and slings and not needing a cover. So I made a blanket big enough for a "just in case" cover. :)

Toy Storage Bags - Applique


Toy Storage Bags - Applique
Originally uploaded by umgeekgirl

My first attempt at applique

For storing a Mr. Potato Head

Toy Storage Bags - Applique


Toy Storage Bags - Applique
Originally uploaded by umgeekgirl

My first attempt at applique.

For storing a tea set

Toy Storage Bags - Applique


Toy Storage Bags - Applique
Originally uploaded by umgeekgirl

My first attempt at applique

For storing a Fisher Price Ring Toy

Toy Storage Bags - Applique


Toy Storage Bags - Applique
Originally uploaded by umgeekgirl

Toy Storage Bags - Applique


Toy Storage Bags - Applique
Originally uploaded by umgeekgirl

My first attempt at applique

First try at pants


First try at pants
Originally uploaded by umgeekgirl

Leather Baby Shoe


Leather Baby Shoe
Originally uploaded by umgeekgirl

Scrap leather from Tandy Leather, pattern modified from TackyLiving.com

Leather Baby Shoe


Leather Baby Shoe
Originally uploaded by umgeekgirl

Scrap leather from Tandy Leather, pattern modified from TackyLiving.com

Needle Storage for E


Needle Storage for E
Originally uploaded by umgeekgirl

Pocket storage for my sister's knitting needles. I made them to fit in her knitting binder

Gratitude Wrap for MIL


Gratitude Wrap for MIL
Originally uploaded by umgeekgirl

Gratitude Wrap for MIL


Gratitude Wrap for MIL
Originally uploaded by umgeekgirl

Needle Storage for E


Needle Storage for E
Originally uploaded by umgeekgirl